Homemade Baked Beans with or without Sausage


This is a bean recipe that I have used for almost 25 years now and I absolutely love it.  I use it as is or as a base for many different dishes. Beans are rich in nutrition, affordable and very filling. I prefer molasses based beans and this recipe bumps up the flavour with the addition of ginger and dried mustard.  These beans are great on their own or mixed with the homemade sausage of your choice. (Chorizo, Sweet Italian, Breakfast). Pictured above with sweet potato with caramelized onion and chili oil and cherry tomatoes.


Ingredients – 6 Servings – $0.46 per serving

2 Cups of Navy Beans (Soaked over night) ($1.85)

1/3 Cup Brown Sugar ($0.16)

1/3 Cup Molasses ($0.47)

Seasonings ($0.25) -The expense of spices is building a pantry….

1 Tbsp Ketchup

1 tsp Dried Thyme

1 tsp Dried Ginger

1 tsp Dried Mustard

1 1/4 tsp Salt (season to taste)

1/2 tsp ground black pepper (season to taste)


One of the things that need to be remembered when working with dried beans is that they often require a good 12 hours of soaking to dehydrate them.  The typical advice is overnight, though I will usually soak them first thing in the morning and then cook them in a slow cooker over night. This is a great thing to do Saturday night and then you can have fish cakes or crab cakes with baked beans and poached eggs for breakfast. Served with a side of Boston Brown Bread this is a great east coast treat.

You should inspect the beans removing any beans that look irregular and check for stones.  Those can ruin your whole day. Put the beans in a large bowel and fill the bowl so there is a good 3 inches of cold water above the beans. Let these soak overnight to gently re hydrate. Don’t try to rush the process by using hot water, or “just boil them longer”. That will result in mushy beans as the outside will start to cook before the middle is hydrated.  I am not a fan of mushy…

Once the beans have been soaked overnight place them in a large pot cover with water and bring the beans to a boil.  Reduce the heat to a simmer and allow the beans to cook for about an hour or until a few of the beans start to split.  Avoid cooking them beyond this point, again… mushy.

I get the best result when I use a crock pot for my beans, this allows low slow cooking over a long period of time.  This leads to deep rich flavour. Pour the beans and cooking liquid into a slow cooker, the liquid should cover the beans by about half an inch.  Add in the remaining ingredients and stir until everything is incorporated. Allow the bean to cook covered overnight (6 to 8 hours). Check the beans after this time and if they are a little runny leave uncovered for another hour or so until you get the consistency you want. The amount of liquid and how long to cook covered and uncovered is the biggest variable in this recipe because depending on several factors the amount required can change.

These are a great base bean recipe and I often play with the seasoning, adding in spice, or acid or smokey bacon depending on my mood.


Cranberries with Orange and Port


Cranberry sauce is a must have for me anytime I have turkey. It is one of my favorite holiday treats.  A basic cranberry sauce consists of 1 cup of liquid, between 3/4 and 1 cup of sugar (no less or it won’t thicken) and 4 cups or 1 12 oz bag of cranberries. (Fresh or frozen).

IMG_3404

I have played with this recipe over the years starting with just simple syrup (1 cup of water and 1 cup of sugar) and adding the berries.  I found that too sweet and one note. My father had the idea of adding port as half the liquid so I stole that right away.  I tried using all port but that threw off the water content (because of the high concentration of alcohol) and when the booze evaporated it didn’t set up right.

I finally came upon the perfect balance for me.  I cut the sugar down to 3/4 of a cup, used half orange juice and half port and put the zest of one orange into the pot.

The orange flavor with the rich port compliments the berries nicely. I like the tang of the berries so I don’t want too much sugar but that is up to you.  However like any jam or jelly don’t cut the sugar too much or you will not get a sauce you will get a soup.

IMG_3405


Ingredients

3/4 to 1 cup of sugar

The zest of one orange

1/2 cup of good quality Port

1/2 cup fresh squeezed Orange Juice

a pinch of salt


Add the berries, orange juice, port and zest into a pot and bring to a boil.  The berries will soften and pop and at that point you are almost done.  Allow the mixture to gently boil until it coats the back of a spoon. To test dip a spoon into the mixture and then when it cools a little run your finger down the middle of the spoon.  The line should hold.

Once that is done chill down the mixture remove the orange peel and enjoy.  If you find it is too runny just pop it back into the pot and boil a little longer.

IMG_3424


Christmas With Stepping Stone


What does food mean to you? Is it a source of nutrition, comfort, entertainment, pleasure, satisfaction or all of the above?  Food is a necessity of life, but for many of us who are privileged enough to have food in abundance its meaning goes well beyond that. Food is the centerpiece of celebration, a way to express appreciation, a way to escape from a stressful day or a way to share memories with friends and family. Think back to the food you enjoyed over the holidays and see how many different ways you used and enjoyed food.

I had the distinct privilege of helping to create a food memory at the annual Christmas party held by Stepping Stone in Halifax over the holidays. My family provided and prepared a wide variety of our favorite Christmas meal items and this effort was combined with the efforts of a small but mighty pool of volunteers to provide a Christmas feast.  I wanted to not only provide nourishment but a special and memorable experience. My family and I prepared our own Christmas recipes with all the love we put into the Christmas season.  Christmas meals are full of meaning to me as they connect me to my family and memories of Christmas past. I wanted to help provide the same thing to the clients of Stepping Stone.


Stepping Stone is an organization dedicated to working with sex workers in our community and is the only organization of its kind in the Maritimes. The dedicated staff works diligently to improve the quality of life for sex workers and does so in a non-judgmental manner working from a harm reduction perspective.  It was my pleasure to cook for the amazing clients and staff of this organization.


Food is something that should unite us so I am going to take a moment for an aside to talk about stigma, something that causes harmful division. Stigma is a debilitating and it interferes with people who are fighting to improve their lot in life. Stigma slowed progress in AIDS treatment, intravenous drug treatment, human rights and safety for the LGBT community and many other areas in our society.  It is currently making the life of sex workers incredibly dangerous and it impedes the ability of those who provide services to sex workers from doing their valuable work.  Sponsors and volunteers are often hard to come by and funding goes up and down at the whim of politicians. Stigma makes it difficult to gain support for resourcing this valuable work. There is much good that can be done to improve the lives of sex workers and their families if we let go of our judgments and engage in solutions. I highly recommend supporting Stepping Stone. Let’s come together and try to understand those who live different lives and end the stigma that causes so much damage.

IMG_3484

Here are links to some of the feature recipes that I used for the meal and as well some tips and tricks for cooking for a crowd (we were preparing food for 100).

Cider and Herb Butter Injected Roasted Turkey with Apple Cider Gravy

Citrus Glazed Ham

Roasted Garlic Mashed Potatoes (Coming Soon)

Orange and Port Cranberry Sauce

Our contribution to the meal also included a homemade stuffing, dozen pies of 3 different varieties (fresh pumpkin, coconut cream and pecan), mashed sweet potato and turnip, honey glazed carrots, dinner rolls and assorted party trays of fruits, veggies, cheese and pepperoni, pickles and crackers.

IMG_3451

Those who know me will not be surprised that I would choose to support people who are stigmatized.  We as a society can be exceedingly cruel to those we don’t understand and I believe that there is where the most valuable work can be done. I ended my association with the church I was a member of because they were promoters of stigma and I got burned out trying to work within that organization to help those in the most need. I have been blessed with a great background in food which I learned in the kitchens of my family. I have decided that this talent can be used to help those who struggle to find help. I will be dedicating my cooking efforts to finding ways to bring special moments to the lives of those who need it most.

IMG_3487

Apple Cider Injected Roast Turkey


The center piece to my traditional Christmas dinner is a slow roasted turkey. I learned this from my Grandpa Skakum who would slowly roast our turkey overnight.  Low and slow gave a delicious moist turkey.  I have added my own touches to this family favorite over the years borrowing tips and techniques from various sources and have come up with what I believe is a very moist, tender and tasty turkey.

IMG_3469.jpg

One of the things I have found I really enjoy is the tart taste of apple in combination with Turkey. Here we will inject the turkey with apple cider and butter steeped in herbs, throw an apple in the cavity of the turkey to help flavor the drippings and top it all off with an apple cider turkey gravy.


Ingredients:

1 Turkey (15-20 pounds)

1 Apple quartered

3 carrots cut in half lengthwise

5 stalks of celery

1 leek cut into ½ inch slices and washed thoroughly (leeks can be full of sand)

1 bunch of thyme

6 sage leaves

2 sprigs of rosemary

Kosher Salt

Fresh ground black pepper


Turkey Injection

1 Cup of Butter

2 Cups of Apple Cider

1 Tbsp Sea Salt

2 sprigs of fresh rosemary

A small bunch of fresh thyme

3 sage leaves


Apple Cider Gravy

2 cups Drippings from the Turkey

1/2 cup Flour (3/4 cup)

2 cups Turkey Stock

1 cup Apple Cider


When cooking a turkey your biggest risk is drying that bad boy out.  Moist turkey is a delicious treat, dry turkey is like a trip through a sand storm with you mouth open.  Not pleasant.

I take a number of steps to ensure a moist turkey.  First of I will either brine or inject it.  I have come to prefer injecting the turkey because it is less costly, less messy and I believe the results are superior,  though a brined bird is also delicious.

I like to inject my turkey with a mixture of butter and apple cider which has been infused with fresh herbs.

Take the ingredients for the turkey injection and put it into a small sauce pot, melt the butter and allow it to slowly simmer for 30 minutes to an hour. Cool to room temperature. (This is important, do not inject hot liquid into your turkey). Once cool stir or shake the injection liquid and then using a injection syringe. I inject 2 loads of liquid into each breast.  I inject at the front of each breast (on the side of the neck) and alter the angle of the needle to inject into different areas while using as few holes as possible. I then inject one load into each drumstick and into each thigh. This adds lots of flavor and moisture into the turkey.

IMG_3501

Once the turkey is injected I cover it in cling wrap and refrigerate it overnight.  This allows it to marinade the meat.

Prior to roasting the turkey I line the pan with celery, leeks, carrot and onion. This helps stop the turkey from sticking to the roasting pan and adds significant flavor to the drippings.

IMG_3454

I then place the turkey on the bed of aromatic and insert the quartered apple, thyme, sage and rosemary into the cavity.  This will add some flavor to the meat but again I do it to add flavor to the drippings, which is the base for the gravy and stuffing. I then salt and pepper the bird.

IMG_3455

At this point I insert a probe into the turkey in the largest portion of the breast close to but not touching the bone to measure the temperature and allow it to come to 40 degrees F before putting it in the oven. Putting the turkey into the oven cold will increase cook time and dry out the meat, allowing it to sit out above 40 degrees causes food safety issues.

Once the turkey is up to temperature put it into a 500 degree oven for 30 minutes. Then lower the temperature to 325 degrees for the rest of the cooking time.  This initial sear will help seal the skin and trap more moisture in the turkey.  If some areas of the skin start to get too dark cover them in aluminium foil to keep those areas from scorching.


Allow the turkey to roast in a slow oven until the temperature reaches 165 degrees. Baste the turkey with the drippings every 45 minutes or so to get a nice color on the skin for presentation and to keep the meat moist.

IMG_3515

When the turkey is to temperature take it out of the oven and cover it with foil and allow it to rest.  Once it is cool enough I move it to a platter or another roaster and allow it to continue resting while I make the gravy and fortify the stuffing using the pan drippings. Do not carve too early or you will release all of the juices and again end up with dry meat.

While the turkey rests pour the pan drippings out of the roaster and reserve keeping the aromatics in the pan.  I usually end up with around 4 cups of drippings.  Put the roaster on medium heat on the stove top (do not try with disposable aluminum roasters). Add back 2 cups of the drippings and heat up until it is boiling.  Add the flour into the drippings and aromatics and stir with a whisk.  Allow this to cook for about 5 minutes to eliminate any raw flour taste.  Then add in the turkey stock and cider. Bring to the boil while whisking continuously.  Once it comes to a boil strain off all of the solids and put the gravy into a pot to keep warm.  If it is not thick enough put a tablespoon of corn starch and a quarter cup of cider into a bowl and stir to combine and add to the gravy.  This should tighten it up.  You do not want overly thick gravy, it loses flavor as you add starches like flour or cornstarch. Once you get the consistency you want salt and pepper to taste.  This is important, use your palette.

At this point you have the foundation to a great holiday meal.  I will post recipes for other sides in the near future.

Cooking ahead for a crowd:

IMG_3459

For the Christmas at Stepping Stone meal I roasted three 23 pound turkeys using the method below and the response was very positive. In this case I needed to cook the turkeys in advance then reheat the meat the day of the meal. The trick was to do this without drying out the meat.  To achieve this I broke each turkey down into four pieces; two whole breasts, two drumsticks and two whole thighs.  I then vacuum sealed a them in 3 bags; two containing a breast and a drumstick and one containing the two thighs. You don’t want to carve the turkey as that will just release moisture during reheating. I then added a ladle of drippings to each bag and sealed them.  They were then chilled down and stored until the party a couple days later.  At that time we just put a big pot of water on and held it just below boiling and put the bags of bird into the bath for about 20 minutes.  When we carved the turkey it was very moist, as if it were carved table side. Try this if you have to cook a dinner for a crowd.

New Year, New Blog


Happy New Year one and all.  I have been absent from the blogosphere for a few years now and have been using other avenues to share my passion for food.  More on that later.  However I have decided that in order to share what I want I need to put in a consistent effort.  I have therefore launched Tim’s Kitchen Table to allow me to share recipes, products, vendors and my activities in the world of food with you.  I will be producing new material and have included selected posts from my prior blog.

New Years dinner is one of my favourite of the year.  To me it has always been (except for an unfortunate culinary diversion into the kosher world) about ham and all the trimmings.  Today I baked and glazed a beautiful free range Ham from my friends at Shani’s Farm.  I also cooked up some scalloped potatoes, sweet potato mash with peas, honey glazed carrots and fresh baked sweet potato rolls.  I served this with Benjamin Bridge’s Nova 7.  A beautiful sparking wine that is a must try.

IMG_3575I much prefer a bone in cured and smoked ham sourced from a local farmer that I trust.  I encourage you all to get to know your local farmers, you will find the best products.  I start the process by soaking the skin and membrane (this is put in place during the curing and smoking process) with a half a cup of Jim Beam Bourbon and then put it into a 350 degree oven for between one and a half and two hours.  This is done with the skin an membrane intact to allow the fat to baste the meat. 

IMG_3551
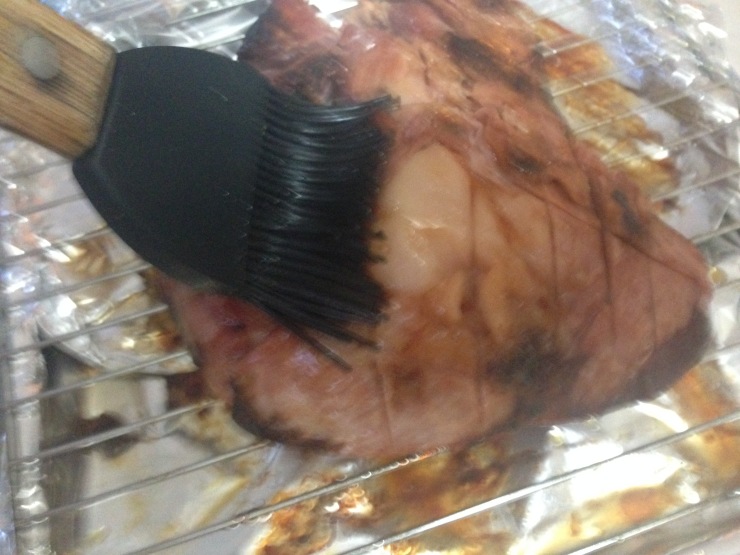
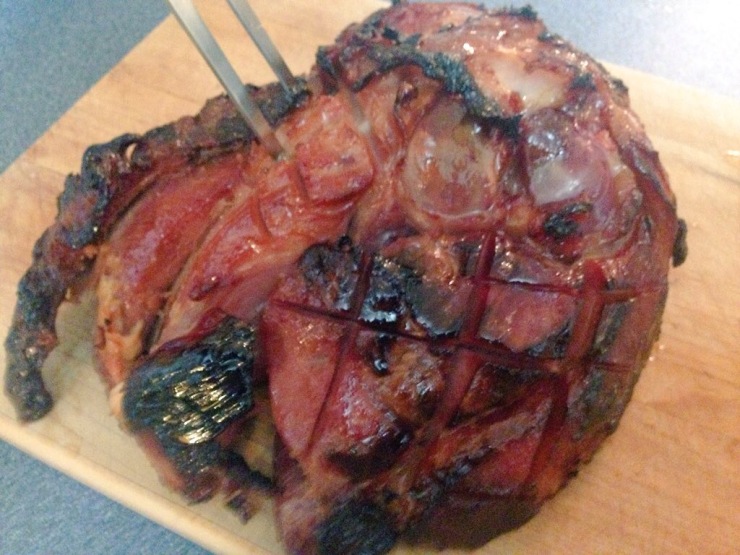
After that is done I take the ham out of the oven and allow it to cool enough to handle.  I then trim the skin and membrane with a very sharp knife leaving the remaining fat intact.  Next I score the fat in a diamond pattern and brush it with a glaze.  Some people put whole clove in the middle of the diamond however as attractive as this is, I find it adds an overpowering clove flavour to the meat that I do not enjoy.  I advise you leave this out.

The glaze I used today was 1/3 of a cup of brown sugar, 1/3 of a cup of honey and 1/3 of a cup of orange juice.  I simmered this until it is a light syrup.

IMG_3562

I then brushed the ham with the glaze and returned it to a 350 degree oven.  Every 10 minutes I brushed the ham liberally with glaze and did this for 40 minutes.  A larger ham should be glazed every 20 minutes for an hour to an hour and a half. 

IMG_3571

Remove the ham from the oven, allow it to rest and then carve and serve with your chosen side dishes.  There are a few steps here but following this process will give you a moist ham with a sweet flavourful glazed exterior.

Please try it and enjoy.

My next post will be about my amazing experience cooking Christmas dinner for the clients,staff and volunteers at Stepping Stone, a fantastic organization that provides support services for Sex Workers.  I used this ham recipe for their Christmas party dinner. One of the best experiences I could have had.

Bacon – The best reason to abandon factory food for local goodness


I started eating local for one reason and one reason only, the quality of the food.  I later started to understand the economic benefits, the health benefits and the value of developing a sustainable local food system here in Nova Scotia.  But to be honest the reason I started was because the quality of the food I was getting from Superstore and Sobeys was no longer acceptable.  I was tired of getting food that was an unreasonable facsimile of the food I remembered growing up in the Annapolis Valley.


Nowhere is this more true than with bacon.  The waterlogged packets of chemically treated flaccid pork belly… its just not right.  What I was not aware of was that you can get some of the best bacon you have ever had directly from our farmers or local smokehouses.  I have sampled 7 different varieties of bacon from 4 different local producers.  This bacon cannot be compared to that which you get in a grocery store.  The smoke is from… wait for it… smoke.  They use natural flavors and spices and do not load the bacon up with chemical filled solutions to increase the weight of the product.  The pork that is uses is small farm raised and it shows in the quality of the meat.

The first local bacon I tried came from Active Life Farm just outside of Truro.  This lightly smoked bacon was made from Berkshire pork, the kobe of pork.  I got a side from them and the first thing that was gone was this rich meaty bacon.  From there I started exploring bacon from as many local farms as I could.

The next bacon I tried was from Sweet Williams at the Halifax Seaport Farmers Market.  They have an amazing variety of bacon including back bacon, shoulder bacon, and nitrate free bacon.  Check in with them and see what they have for you on any given weekend.  The nitrate free bacon was great, there was no taste difference and for those who want to remove nitrates from their diet this is a great option.  Back bacon has always been one of my favorites and this is a great product.  However the most remarkable experience for me was the shoulder bacon.

Pork shoulder is one of the most flavorful cuts of pork and is sought after by BBQ connoisseurs everywhere because of its ability to take smoke.  A well marbled shoulder is the essential cut for amazing pulled pork.  Sweet Willams takes this cut of meat, cures it (in the same way you would cure belly to make traditional bacon) and then slowly smokes it and slices it thin.  This shoulder bacon is full of rich pork flavor, has a great toothy bite and is full of salty, smoky goodness.  You can use this bacon in baked beans or use it instead of corned beef with cabbage for a great east coast supper.  My favorite application of shoulder bacon though is in a traditional breakfast sandwich.  A couple slices of this bacon with a nice poached egg on a homemade english muffin is a real taste treat.

The other location to get great bacon at the Halifax Market is Roselane.  They have your standard sliced bacon but the bacon that brings me back over and over is their double smoked bacon.  It is well cured, double smoked and then sliced ever so thin.  A little bit of this in a sandwich or in a potato salad adds a beautiful rich smokey flavor without overpowering your dish with bacon.  The other thing I like about this bacon is it is dry… it has not been loaded with water to increase the weight so when you cook it you can actually get a sear.  It is a real treat to cook bacon without getting a steam facial.

The most recent place I have tried getting bacon from is Meadowbrook Meat Market located just outside of Berwick.  This farm to table operation produces some of the best bacon I have ever had.  Using sustainable farming methods to produce the pork and then curing it and smoking to perfection they produce an amazing product.  Their varieties include a maple bacon that has my house smelling like a sugar shack and a Montreal smoke meat spiced bacon that as Chef Greg Clancy of Untitled Eats says “is a game changer.”  This farm to table high quality approach has earned Meadowbrook the Taste of Nova Scotia 2011 Producer of the Year Award.  Here in the city you can pick up their product at Pete’s or at the Alderney Gate Ferry Terminal 7 days a week.

Once you have sourced some real bacon from one of our local suppliers you need to take your time cooking it.  Never slap bacon into a hot pan, this will lead to bacon where the meat is hard and overcooked and the fat is stringy and unrendered.  Pork belly requires low slow cooking.  On a griddle or in a frying pan heat the pan over very low heat (1 or 2) and then lay the bacon in filling as much of the pan as you can without overlapping.  Allow the bacon to slowly cook, I turn it every 3 to 5 min for the first 15 min to ensure even cooking.  Then in the end turn in more frequently.  It takes about 20 minutes to get it cooked properly.  Also never drain off the fat, cooking bacon in its rendered fat helps keep it tender and stops the meat from burning before the fat is rendered out.  When you see really small bubbles of fat that indicates that much of the water has been cooked out and you are almost done.  Rest your bacon on a clean paper towel and serve.  This will give you a crispy bacon where much of the fat has been rendered out so there are no stringy bits.

Pork is the most popular meat in the world and bacon is so popular I know vegetarians who eat it. (I kid you not I roomed with a vegetarian who tried to sick me out when I ate meat but would drive across town to get bacon).  However as with many great foods we don’t get the real goods at our factory food outlets.  If you want to have the best bacon available I strongly encourage you to try out some of our great local suppliers.