Fresh Pasta – Comfort Food for All Seasons


Italian food is my idea of comfort food and nothing says Italian more than a plate of pasta.  I enjoy fresh pasta with a rich meaty tomato sauce.  Soft toothsome noodles coated with a rich tomato sauce with a little bits of tender ground beef.  All of this topped with fresh grated Parmesan cheese and fresh basil is a treat worthy of a fine restaurant but is simple enough to prepare at home.

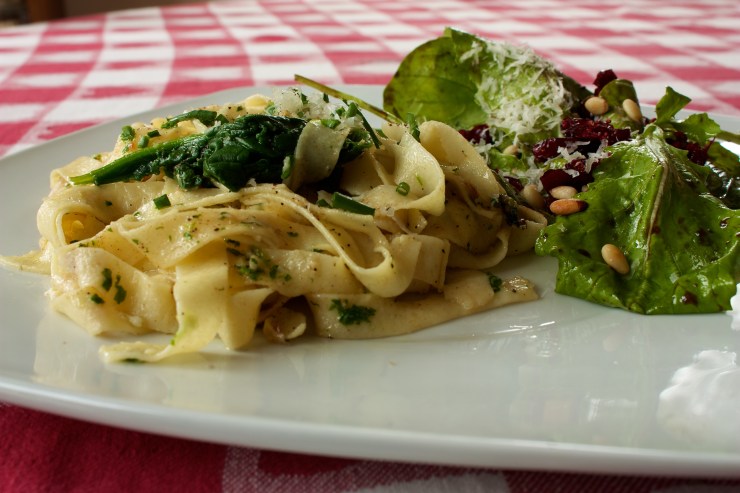
In the spring time pasta can be combined with a little ricotta cheese, some wilted spinach, browned butter, balsamic and toasted pine nuts.  We can make our favorite stuffed ravioli or use it to make the perfect lasagna.  Fresh pasta will enhance your Italian recipes and it is quick and easy to make.

To make fresh pasta I am going to rely on my favorite kitchen toy, the ever helpful Kitchen Aid Mixer.  This takes all of the kneading and most of the floury mess out of making pasta.  It is quick and easy, and there is no comparing proper fresh made pasta to that which you can get in the store.

Flour is very important.  You want to use 00 Semolina flour.  This course grain flour is is perfect for making a toothsome tender noodle.  Using all purpose or whole wheat flour will still give you a noodle but the texture is just not the same.  The other thing you want to avoid is using a lot of water in your pasta. Too much water will build excessive gluten and make your noodles tough.  You also do not need to add salt into your pasta, as you will see you will boil the pasta in salted water, that will give you all the salt you need.

Here is a simple pasta recipe that you can use as the base for all of your italian favourites.

Ingredients

300 g  Semolina flour (about 2 cups)

3 Eggs and 1 Egg yolk at room temperature

1 tbsp olive oil

Room temperature water if needed (1 tbsp or less usually)

Making the dough

In the bowl of your KitchenAid mixer pour in the flour and make a well in the middle.  In a small bowl beat your eggs and oil together. Add into the well.  Attach your dough hook and begin to mix on low.  The flour will begin to get mixed into the liquid, after a few minutes scrape down the sides and continue. Once all the liquid has been incorporated lift the hook and bring the dough together with your hands.  Put the dough hook in the middle of the ball and again mix on low.  The ball should break up then reform after a minute or so, if not add in a little water, I usually don’t need any.  Allow this to kneed for about 2 minutes.

Remove the dough and wrap in plastic wrap and allow to rest at room temperature for about an hour.  This is particularly important, the semolina needs the time to hydrate or your dough will fall apart when working it and the gluten you have formed needs to relax or the dough will be springy when your working it.

If you don’t have a mixer, this is still easy to do.  Just put down a pastry sheet and pour the flour in a mound and make a well in the middle.  Add the egg and oil mixture into the middle.  Stir the liquid scraping a little flour in each time.  Slowly incorporate the until it is a thick paste.  Then put a little flour on your hands and using your hands fold in the rest of the flour into the paste.  Form a dough ball and kneed on a floured surface for about 3 minutes.  This will be a firm dough but if it breaks up add a little water.  When done you will wrap and rest as above.

Cutting the Pasta

If you are going to make pasta it is best to have a pasta machine but it is not required.  A pasta machine will allow you to get a nice thin noodle with a consistent thickness.  If you are good with a rolling pin, flour your counter, and roll the noodle to about 1/8 of an inch thick.  Flour the top of the dough lightly then roll it up like you would a jelly roll.  Using a very sharp knife slice off the pasta into the widths you desire.  You can also use the pasta as lasagna sheets or as the top and bottom or raviolis.  I will be posting lasagna and stuffed pasta recipes in the near future.

If you are using a pasta machine then roll the dough out until it is about 1/4 inch thick, then set the rollers on the machine to the wides thickness.  Pass the pasta though the machine, reducing the thickness each pass until you reach the desired thickness.  You can then use the cutters to cut to the desired noodles or use it for lasagna or ravioli.

Boiling the Pasta

Heat up a large stock pot with water, add in about 1/4 cup of salt and a tbsp of olive oil and bring to a rolling oil.  The salt is important because it flavors the pasta, we did not add any into the recipe, the oil will coat the pasta when it is drained and adds flavor.  You want a rolling boil so the pasta does not stick together.

Place the pasta into the boiling water and boil for about 2 minutes.  To test take out a noodle and taste, it should be cooked through but still firm to the tooth.  You do not want mushy pasta.  Drain the pasta and DO NOT rinse it.  That starch is great to thicken your sauce and will help the sauce cling to your noodles.

Saucing the pasta

Finishing the pasta properly is very important.  At this point your pasta is like a sponge, all ready to absorb the the amazing flavors of your sauce.  What you want to do is heat up about a half a cup of sauce in a pot, once is is nice and hot throw the pasta back in pot over medium heat and stir until the sauce is absorbed.  This only takes a minute or so.  Then plate your pasta and top with a little more sauce.  This will give you a very flavorful pasta and you will find you will need less sauce.

I will put up a couple pasta sauce recipes to go with this soon.

The First Spring Greens – Dandelion Greens


I can admit it, last year in my CSA I was totally unprepared for the spring onslaught of greens.  Collard greens, beet greens, kale, and swiss chard kicked my ass last year.  I could not get past the bitterness, was not sure how to cook them and was not happy at all with the results.  I watch a lot of Food Network and noticed that people from the Southern USA go crazy for greens, I could not for the life of me understand why.  Southerners, the guardians of BBQ, corn bread, mac and cheese and everything bacon, cannot be considered culinary martyrs.  If they are eating this stuff then it has to taste good.

I paid particular attention any time anyone on Food Network cooked greens, I also did some reading and discussed green preparation with a few of my twitter friends.  The first thing I learned was don’t be shy about cooking greens.  There are amazing nutrients in these greens, but they are locked up and cooking them well makes the nutrients easier for us to absorb.  Also cooking them leaches out some of the bitterness, they will still have a bitter flavor, but don’t be afraid of that, we will balance that with other flavours.

Bitter ingredients beg for fat, spice, sour and sweet.  Not to cover up the flavor but to balance it.  Now I know some people will question the use of fat here, but as was pointed out to me by Halifax nutritionist Kristine Elliott (@FeistyForks for twitter), many of the nutrients in greens are fat soluble so they will be absorbed much better if they are cooked with some fat.

My first greens this year are some of the most bitter, so it was exactly what I needed to get my green preparation down cold.  Greens were a major fail last year in this house, but the following recipes were very well received and I feel like I am ready for my spring greens.  Here are my two dandelion green recipes, and this approach will work for other bitter greens as well.

Initial Preparation:

Ingredients: 

6 cups of dandelion greens

2 tbsp sea salt

1 tbsp cider vinegar

Heat a stock pot about half full of water to a rolling boil, add in 2 Tbsp of salt and 1 Tbsp of cider vinegar.  Place the greens in the water for 12 to 15 minutes.

Drain the greens thoroughly and you can use them in one of the two following recipes.

Dandelion Greens with Bacon and Balsamic Vinaigrette

Ingredients:

1 batch of boiled greens

2 strips of thick cut meaty bacon

1/2 a small onion fine dice

1 tbsp sesame seeds

2 tsp extra virgin olive oil

1 tsp balsamic vinegar

1/2 tsp dijon mustard

1 tsp honey

Salt and Pepper to taste

Dice the bacon into 1/4 inch dice and render the fat off, cooking until crisp, remove from the pan and reserve.   In a saute pan heat up keep 2 tsp of the bacon fat and, add in the chopped onion and sweat until it become translucent, add in the sesame seeds.  Add in the drained greens and stir, separating the greens and mixing in the onion and sesame seeds.    Add in about 4 turns of fresh ground black pepper.  Saute until the greens are very hot and any excess moisture has cooked off.

While the greens are cooking make a dressing.  Dressings are a simple ration of 3 parts oil to 1 part vinegar.  For this I used 2 tsp of olive oil, and 1 tsp of walnut oil to 1 tsp of balsamic vinegar.  I added in a 1/2 tsp of Dijon mustard and 1 tsp of honey.  Stir this together and add it to the greens.  Once it is hot add salt and pepper to taste and serve.

Sautéed Dandelions Greens with Garlic and Red Chili

Ingredients:

1 batch of boiled greens

2 tsp of olive oil

2 cloves of garlic

1/2 a small onion fine diced

1 tbsp toasted sesame seeds

1/2 tsp dried crushed red chili

1 tsp of argan oil (or sesame seed oil)

1 tsp of white wine vinegar

1 tsp of honey

Salt and pepper to taste

Heat the olive oil in a saute pan, add in the onion, crushed red chilies and garlic and sweat them off.  In another pan toast the sesame seeds until golden.  You want this toasted flavor, it will replace the smokiness from the bacon in the first recipe.  Add in the sesame seeds and greens to the pan and cook until they are very hot and the excess liquid has cooked off.  Mix the argan oil (or sesame oil), white wine vinegar and honey and then add to the greens.  Cook for a few more minutes then add salt and pepper to taste and serve.

Argan Oil: 

This is a new product to me.  I am trying to expand my inventory of healthy oils to use in sauces, dressings and dips.  Argan oil is an extremely healthy oil rich in essential fatty acids and vitamins.  It is produced out of Morocco and using this oil is not only healthy but also humanitarian benefits. The tree that produces the nut is endangered and UNESCO has hope that the expansion of sales of this oil in developed nations will encourage the cultivation and preservation of this tree.  It is a tree that does well in the harsh North Africa climate so it would be very advantageous to have groves of this tree.   The purchase of this oil also supports the women of the Berber tribe as they produce and sell this exclusively.  This is an amazing product, very nutty and rich.  It will add a lot of flavor to your veggies and salads.  Though I use predominantly local ingredients if I am going to send money over seas for a product that cannot be cultivated here, this is a great product to use.  I encourage you to hit the Halifax Market on International Day (Every Friday) and drop by the booth where it is sold.  There is a very nice young man there that will tell you all about this fantastic product and give you a taste.

Thanks to my local suppliers:

Dandelion Greens, Onions :           Taproot and Noggins CSA

Garlic and Bacon:                              Active Life Farms

A Spicy Local Beef Burger for @SweetAmyRae


I was looking for a little culinary inspiration last week and tweeted out asking for suggestions about what I should cook.  Amy Sears (@sweetamyrae) came back suggesting a hamburger that was spicy with something crunchy on it.  That was just the ticket and I was off to the kitchen.

I am fortunate to have a great supply of Getaway Farm ground beef in my freezer.  I gave up on factory food ground beef about a year ago when I requested a food safety inspector check out the use of frozen beef in Superstore ground beef.  This beef packaging was not labeled as previously frozen and I thought the practice was inappropriate. A fellow foodie (Susie the Foodie – her link is to the left) recently tried to get clarification from Superstore about their ground beef and could not get a clear answer either.  Unfortunately this has not as of yet lead to changes but I am still in discussions with meat inspectors to see if we can get labeling changes.  Though I think their behavior is reprehensible I am thankful for them pointing me the way to local food.  Had they produced a quality product I would have never found the bounty I enjoy today.

If you have great beef as your base you need to do very little to it to make a great burger.  To a half pound of beef I add 1/2 tsp of salt, a half dozen turns of fresh ground black pepper and a tsp of worcestershire sauce. Mix the beef well with your hands and form into patties.  Cook the beef in a very hot pan in a little grape seed oil.  The sear adds flavor and locks in juices, brown well on both side.  The patty should be cooked to a temperature of 160 degrees.  Place a thin slice of medium cheddar on the burger.  I used Fox Hill Cheese for this burger.

I placed this burger on a homemade bun which I made using a Fresh Crusty Sandwich Rolls – Mexican Inspired” href=”https://timskitchentable.wordpress.com/2010/12/11/fresh-crusty-sandwich-rolls-mexican-inspired/” target=”_blank”>bun recipe I blogged out earlier.  The only change I made to it was I a did not use an egg wash and shaped the buns differently.  To shape a hamburger bun roll a 2.5 oz ball flatten with the palm of your hand and then allow it to rise.  The rest of the instructions are the same as in the original recipe.

To add a spicy element I wanted a sauce.  I have seen a number of hot pepper mustard sauces so I wanted to make my own.  I roasted off 2 habaneros 3 serranos and a hot cherry pepper.  I put them into the blender with 1/2 cup of yellow mustard and 1/2 of a cup of apple cider vinegar, and 2/3 of a cup of sugar.  Blend until smooth then strain through a fine mesh strainer to remove any skin and seeds.  Bring this to a boil and add a Tbsp of honey.  I then mixed together equal parts of oil and flour to a bowl and added 2 tsp of this mixture to the sauce to thick it, stir and then remove from heat and allow it to cool.  This got spread on the top bun of the burger.

To add some brightness I tossed some fresh spinach with my fig and vanilla aged balsamic and put that on top of the cheese.  You can make a vinaigrette with 1 part vinegar 2 parts oil, 1 part honey and a splash of vanilla.  To finish the burger I made some fresh cut fries and crispy onion strings.

To make the fries cut potatoes into fries and then in 325 degrees blanch them until they just start to brown.  Don’t over crowd the oil do in smaller batches. Drain the fries off and allow to completely cool.  Heat the oil up to 390 degrees.  Add the fries back into the oil and cook till golden brown.  Drain on fresh paper towel and then salt right away with fine sea salt.

To make the onion strings peal the onion, cut in half and slice each half into thin slices.  Break the strings apart and coat them in lightly salted flour.  Drop them in the hot oil for a few seconds until browned, this does not take long at all but they are delightfully crisp and yummy and really add to the burger.

Thanks to My Local Providers

Beef :                                               Getaway Farms

Potatoes and Veggies :              Noggins and Taproot CSA

Cheddar Cheese:                         Fox Hill Cheese House

Home Cured Ham… All the flavour none of the chemicals


I have always loved the holiday meal.  Matters not the holiday, the opportunity to dig deep and prepare a special meal the celebrate an occasion has always been something to look forward to.  There have been some fantastic cooks in my family, meals at special occasions have always been memorable and I try to emulate the same honest home cooking that was found at my grandparents table.

Since I started my journey away from factory foods I challenge myself to use food that is as unprocessed as possible.  With it being Easter I found myself looking at how I could get away for the highly processed ham that we find in our local factory food outlet.  Pork is a great meat and I really enjoy it, and ham is right under bacon in the my pork pantheon.  The problem with this is that the commercial version of these meats is loaded with sodium and even worst nitrate and other chemicals.  As with anything else I figured there has to be a better way.

In the fall I purchased a side of pork from my friends at Active Life Farm.  I got the belly cured into bacon for me as I don’t have a smoker …. YET … but I took the legs uncured.  I thawed a leg out and started researching how I could cure a ham, and the results were spectacular.  Thanks to Active Life for making this amazing Berkshire pork available to me, it was the highlight of my Easter Sunday meal.

When curing meats you will need salt and flavor.  The salt is used not only to add salty yumminess to the meat but to also allow osmosis to draw in the other flavors and moisture from the liquid.  You can be as creative as you want with the curing liquids as long as you remember the salt and sugar are required.  Without the salt and sugar to draw the flavor deep inside the meat you will just flavour the outside and that is what the glaze is for.

Here is how I cured my Easter Ham:

Brine:

6 Liters of Water

4 Cups of course salt

2 Cups of demerara sugar

1 Cup of maple sugar (optional – can replace with 1 cup demerara sugar)

1 Stick of cinnamon

6 Whole cloves

5 sage leaves

6 black pepper corns

1.5 tsp red chili flakes

Glaze:

1/2 cup brown sugar

1/2 cup maple syrup

2 Tbsp of Whole Grain Mustard

1 tsp cinnamon

1/4 tsp grated nutmeg

1/2 tsp sage

Combine all ingredients in a large stock pot, bring to a simmer and stir until all of the salt and sugar is done.  A number of brine recipes will say you are done at this point but I cover and allow it to steep on low heat for 30 to 40 minutes.  I want all of the flavor in the herbs and spices to infuse the liquid.  A note on my sugar selections.  I wanted to impart subtle flavors to the ham so I chose demerara sugar (a very rich dark brown sugar) and maple sugar.  I wanted the various subtle notes from those sugars in the meat.  I would use the demerara sugar which is readily available every time, the maple sugar I was able to get a good deal on but if you don’t have an affordable local provider don’t spend a fortune on it, it can be very expensive.

Allow the brine to cool then refrigerate until it is cold.  Do NOT put the meat in the brine until it is cold (under 4 degrees C or 40 degrees F).  You do not want to have the meat in a warm water, that will encourage bacteria growth and cook the meat. Always brine in cold water.

To prepare the ham for brining, score the skin and fat in a diamond pattern on all sides.  Do not cut into the meat but cut through the fat and the skin, this will allow brine penetration.
When the brine is cold, place the meat in it and completely submerge.  you can put a couple plates on it to weigh it down.  Brine for about 16 hours, no more than 24 hours it will be over salty.

When the ham has been brined remove from the water, discard the brine and rinse the ham off removing the excess salt from the surface of the ham.  If you bake it without rinsing you will have a salt crust, the purpose of the salted brine was to draw moisture and flavor into the meat, we will flavor the outside with a glaze.

Place the ham on a roasting rack in a pan and place into a 500 degree oven for 20 minutes.  This will sear the outside of the ham locking in the juices and adding flavor.  This is done unglazed which is important,  if you try to glaze the ham at a high temperature or to early you will burn the sugar.

After 20 minutes reduce the oven to 350 until the internal temperature reaches 145 degrees.  This will take about 2 – 3 hours depending on the ham.  Temperature is the only true indicator of meat being done.  Time is only the roughest of estimates, if you want juicy meats that are safe to eat, use temperature.

After 20 minutes at 350 spread a layer of glaze over the ham, reglaze every 20 minutes until the ham reaches the desired temperature.  When you get to 145 remove the ham from the oven and tent in aluminum foil for 30 minutes.  The ham will go up about another 10 degrees in temperature, it is still cooking after it come out.

After the meat is rested slice and serve with the remaining glaze to be used as a sauce.

I accompanies the ham with a walnut dressing (walnuts, olive oil, sage, honey and balsalmic with salt and pepper), mashed skin on red potatoes, honey glazed carrots and a gratin of Jerusalem artichokes.

Thanks to all my local suppliers:

Berkshire Pork Leg : Active Life Farms

All vegetables : Tap Root and Noggins Corner 

Honey: Cosman and Whidden Honey

Milk: Fox Hill Cheese House

Eggs Florentine with Tomato Basil Salad


I got a beautiful bag of spinach in my first week’s CSA share and decided to use some of it for my breakfast today.  There is no chance that if I bought spinach from my local factory food outlet it would be fresh and beautiful a week later, but with farm fresh food you get a lot more time to use it up.  I steamed off the spinach in 1/2  a cup of boiling water covered until it just wilted.  I then drained it and squeezed out as much liquid as I could returned it to the pot added a punch of salt and 1/4 tsp of balsamic and set it aside.

Now when I think of spinach for breakfast I think eggs florentine.  This is a poached egg, served over steamed spinach on a crispy english muffin topped with hollandaise sauce.  Now don’t be afraid of hollandaise, it is a great mother sauce that can be the base for many delicious toppings, and if you pay attention you will get it right.

Hollandaise Sauce

Hollandaise is an emulsified sauce, and one of the French mother sauces.  An emulsified sauce is just a sauce that combines fat based flavor with water based flavor (usually something acidic).  In this case it is butter and lemon juice and the emulsifier (the thing that binds them together) is egg yolk.  To make a Hollandaise you need the following:

Ingredients

3 egg yolks

1/2 cup clarified butter

1 Tbsp water

1 Tbsp fresh squeezed lemon juice

salt and pepper

Tabasco sauce

Melt about 3/4 cups of unsalted butter, being careful not to burn it, let it bubble for about 3 minutes and then skip off all of the foam, pour into a bowl slowly leaving all the white bits in the pot.  Wash and dry the pot, return the clarified butter to it and put it on your warming element to keep it warm.  You will not use all of this butter,

Take a small pot and fill half full with water and bring it to a light simmer.  in a small metal bowl add in 3 egg yolks, the lemon juice and water, whisk until it is lemon yellow in color.  Now we need to incorporate the butter.

Place the bowl over the heat and stir the egg yolks, until you start to see trails left i the bowl.  Remove from the heat and drizzle about a tbsp of clarified butter into the bowl and whisk until the the butter is combined over the the simmering water.  Drissle in another tbsp of the butter.  Keep doing this until the sauce is shiny and smooth, it will start to slide around the bowl.  At that point stop.  If you add to much butter it will break.

If it does break do not panic, you can save it.  Take another egg yolk, put it in a clean bowl, add a little water and whisk until yellow, heat it for a minute over the hot water then whisk in the broken sauce, it will come together.  Finish with a little salt and pepper to taste and a few drops of Tabasco sauce.   This sauce is beautiful over eggs, or veggies like asparagus.

You will need to make a couple poached eggs.  A couple quick tips for making poached eggs.  Bring the water to a simmer in a fry pan, add in some salt (about 2 tsp) and a tsp of vinegar.  Add in the eggs (don’t over crowd the pan) and allow to cook until the whites are set.  Remove from the pan and let drain on a plate.

To assemble your eggs florentine you will need to toast off a couple english muffins and poach some eggs.  Place the english muffin on the plate top with some spinach, a soft poached egg and the spoon over some hollandaise sauce.

Cherry Tomato Basil Salid

Ingredients

2 cups of chopped cherry tomato

3 tsp extra virgin olive oil

1 tsp balsamic vinegar

2 leafs of fresh basil chopped

salt and pepper to taste

I served this with a tomato basil salad using fresh cherry tomatoes from the greenhouse of Riverview Herbs.   I chopped up the tomatoes, made a vinnagrette using 3 tsp of very extra virgin olive oil, 1 tsp of balsamic vinegar, and a half a tsp of the hollandaise to emulsify the dressing.  Whisk the dressing and toss in with the tomatos then add a couple leafs of chopped basil.  It goes great with any egg dish.

Thanks to my Local Suppliers:

Eggs:                                      Elmridge Farm

Spinach:                                Taproot CSA

Tomatoes and Basil:         River view Herbs at the Halifax Market

Berkshire Pork Chops with Apple Chutney, Roasted Potatoes and Beet Salad


I had a great trip to California and while I was there ate amazing local California food.  Now that I am back I am rededicated to eating our great Nova Scotia local food.  I received my first CSA boxes last week and it was waiting for me when I got home.  I have had a few great meal out of it and will be getting another box today to add to it.

In my first box there were some baby red potatoes and baby beets.  I boiled these both so they would be ready to use for preparing a quick meal.  For those who are not familiar with cooking beets here are a couple quick tips.  First of all you want to boil them while, do not trim them (well trim the greens of course) and boil them until fork tender.  Adding a little vinegar to the water will help the beets hold their color.  When done let them cool, trim them and then peal them with the edge of a paring knife.  You may want to wear gloves to keep your hands from turning purple :).  These beets can then be used in a number of dishes.

I also like to boil up the potatoes until just fork tender, maybe a little hard in the middle.  I will then use these to make roasted potatoes, potato salad or breakfast hash.  By doing this prep work it makes it very easy and fast to add vegetables to your meals.

I used the beets and potatoes for supper that night.  I thawed a couple of Berkshire pork chops and had those with an apple chutney, roasted potatoes and a beet salad.

The pork chops were just seasoned with salt and pepper and fried off.  Berkshire pork is so flavorful it does not need much.  However to make it great you need to get a good sear on it.  This caramelizes the outside creating flavor and locks in the juices.  To do this heat the pan on high heat, use grape seed oil because of the high smoke point.  When you lay the chops in do not keep lifting them, let them sit undisturbed until golden brown, look under every couple minutes to check, then flip once.  The pork then should be allowed to rest for 5 to 10 minutes to allow the proteins to relax and draw the moisture back inside.

I served this with the following sides (Serves 2 you can scale it up):

Cinnamon Apple Chutney

Ingredients

2 Apples – Diced

2 Tbsp – Dried Currents

1 tsp cinnamon

2 Tbsp brown sugar

2 Tbsp Apple Brandy

2 Tbsp Apple Cider

pinch of salt

While the pork is resting take the hot pan with the drippings in it and add in chopped apples, dried currents, cinnamon and brown sugar.  Saute these off until browned then add in apple brandy and apple cider.  Allow this to cook down until tender and use this to top the pork chops.

Roasted Baby Potatoes 

Ingredients

6 baby red potatoes

2 tsp Olive Oil

pinch of sea salt

2 turns of pepper

1 tsp minced sage leaf (fresh is best)

To roast the potatoes I just heat the oven to 425, in a bowl toss the potatoes with olive oil, sea salt and black pepper and a little bit of snipped sage leaf.  Roast the potatoes for about 15 minutes or until they start to brown.

Baby Beet Salad

Ingredients

10 baby beets boiled, pealed and diced

3 tbsp Olive Oil

1 tsp nut oil (walnut, sesame seed or Argan)

1 tbsp Balsamic vinegar

1 tsp honey

1/2 tsp mustard (whole grain is best)

salt and pepper to taste

2 Tbsp sesame seeds (toasted)

Dice the beets and place into a mixing bowl.  In a small bowl whisk together the olive oil, nut oil, vinegar honey and mustard.  This makes a nice dressing.  A note here, you can use any oils and vinegars you like, the ration is 3 to 1 oil to vinegar.  The mustard helps to bring the oil and vinegar together (emulsification) and after that just flavor away.  It is very simple, just use good products and fresh herbs.

I then added the dressing to the beets until it was dressed to my liking, I had some left over that will be destine for a spinach salad.  I then toasted the seseme seeds over medium heat in a small no stick pan until they just started to brown.  Keep them moving while doing this, they do burn fast.  Add these to the salad and serve.

The great thing with local food is with a little creativity you can make great tasting healthy meal in a very short time.  With the potatoes and beets boiled ahead of time this whole thing took 30 minutes.

Thanks to my local suppliers:

Pork Chops :                                                                   Active Life Farm

Beets, Potatoes, Sage, Apples, Apple Cider:          Taproot and Noggins CSA